Kevin Whitman's Blog

Tag: Ubuntu

Free ChunkHost VPS

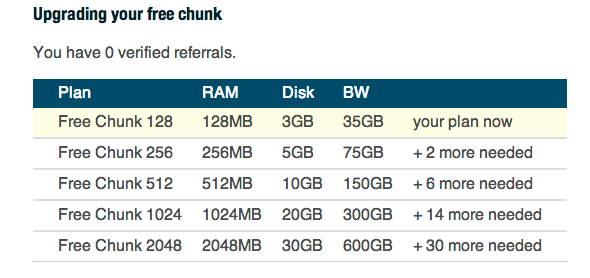
ChunkHost is giving away free VPS’es. They start at 128MB of Ram, 3GB of disk space and 35GB of bandwidth but the cool thing is, if you refer people you can get it upgraded to 2048MB of ram, 30GB disk and 600GB bandwidth which is great. I guess to them this is free marketing and if people like their free VPS, maybe they are hoping if you need a bigger one or a second one(maybe another project) that you’ll pay with one of the paid plans.

I signed up about 2 months ago and today I woke up to my email saying that it got created. The time for waiting might be different for you as I’m not sure how they allocate them.

I SSH into the server and set up a basic demo page. http://vpsdemo.keverw.com/. They offer Ubuntu 10.04LTS, Ubuntu 10.10, Ubuntu 12.04LTS, Debian 5 (lenny), Debian 6 (squeeze), CentOS 5.6 and CentOS 6.2 for the operating system choices. I’m using 12.04LTS as it’s the latest Ubuntu OS they offer. But if you really wanted the least release (Ubuntu 12.10 currently) I don’t see a reason why running the update commands from within 12.04 would stop you from updating. I think this small 128MB server would be great if you wished to host a small website to get yourself started. Great if you just want to play around with Linux, and if you screw up you can reimage it.

You can check out the part two of my guide of setting up a sandbox in a VM, scroll down to “Connect via SSH” to see how to connect and the commands to setup PHP, MySQL and PHPMyAdmin once you get your server created.

Disclosure: I linked to ChunkHost using my referral link. Hoping to get my VPS upgraded to the max, planning on hosting a future project on it that should be ready around mid 2013. If you signup you can do the same by sharing your referral link with friends and family via social networks, your own blog, etc.

Set up a sandbox to test PHP Apps: Part 2, Install Web Server, PHP, MySQL and PhpMyAdmin

We already installed Ubuntu. Set up root. Now we are going to start up the server again for part 2. Going to login as root.

You could enter commands in the virtual box screen, but copy and paste seems to not work. Plus scroll does not seem to work. So i like to SSH in to it with a SSH client.

Get the server IP:

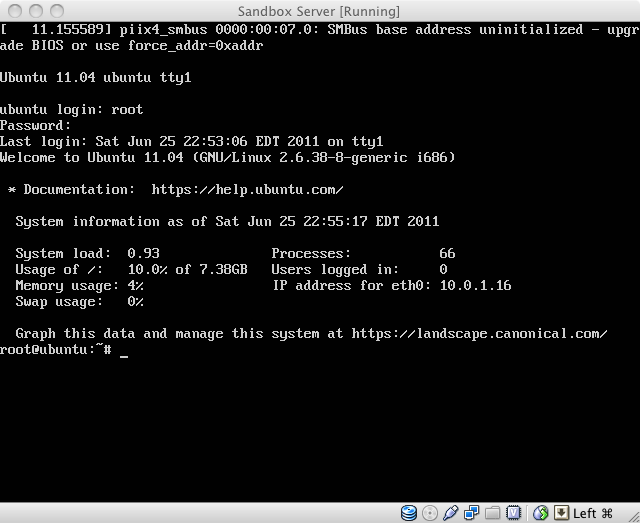
First we need to get the ip of the sever. When we first login it shows the IP address.

Another way you can get the server ip address is by ifconfig

Connect via SSH:

Open up the terminal App on the Mac.  My server IP is 10.0.1.16.

[code lang=”bash”]
ssh SERVERIP -l root
[/code]

Continue reading

Set up a sandbox to test PHP Apps: Part 1, Set up the VM

In this short tutorial series I’m going to teach you how to set up a Linux Apache MySql PHP(LAMP). We will be using free and open source software for this tutorial.  The Linux operating system we will be using is Ubuntu 11.04, my favorite Linux distro. VirtualBox will be the virtual Machine we will be using, but most of this tutorial should work with other virtual machines. At the end of this tutorial you should have a working server which can run PHP scripts, also will have PhpMyAdmin for your database.

Tools you will need:

First lets download and grab all the tools we will need.

You can download VirtualBox for free at http://www.virtualbox.org/wiki/Downloads which works for both Mac and Windows, you can install this like a normal Mac or Windows app. Since i’m using a Mac right now, i’ll download the one for OS X hosts.

Next you will need the Ubuntu ISO. You can get that at http://www.ubuntu.com/download/server/download. I got the 32 bit version.

Next your going to want a way to SSH in to your server. On Mac you can use the Terminal. On Windows you can use Putty. You can download it at http://www.chiark.greenend.org.uk/~sgtatham/putty/download.html.

Your going to need a SFTP client to transfer files and understand how to use it. Check out my How to SFTP tutorial.

Last you need a text editor. You can use anyone really, it just needs to be pain text.

Set up the virtual Machine:

First you need to install Virtual if you don’t have it installed already. This is the same as installing just about any other app. Click the installer and follow the setup wizard.

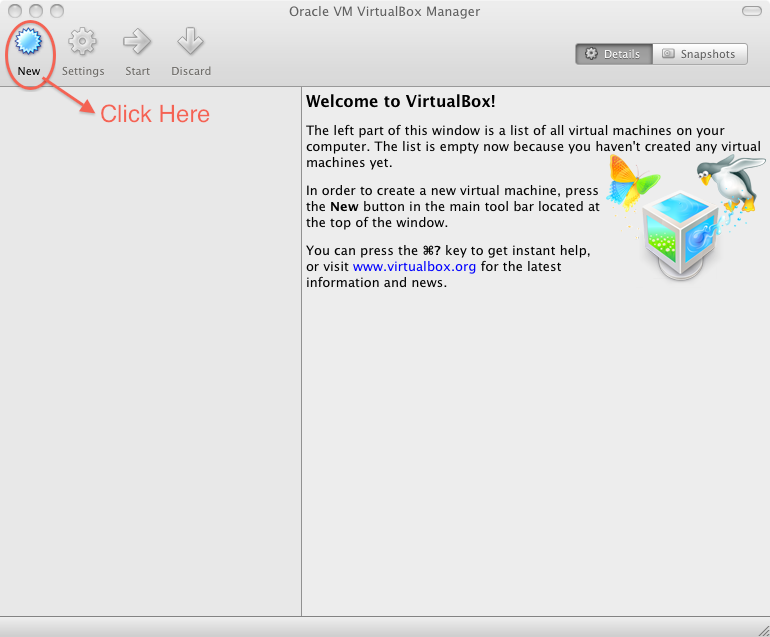
After Virtual Box is installed, we have to then create a virtual Machine.  To start click on the new icon.

Continue reading

Copyright © 2010 - 2024 Kevin Whitman's Blog

Back To Top ↑